
Monday, July 31, 2017
Fire in the Lake...the next title covered
Fire in the Lake will begin a rather Vietnam centric posting spree on this blog the next few days. Expect to see me learn, cover and make a lot of mistakes in the game.

GCACW: Final try...Ewell's attack is a disaster, the 1st Maine cavalry dissolves....end game
The Confederate victory point total now stands at 0. They had one but lost one when they lost a manpower point last turn on that disastrous creek attack
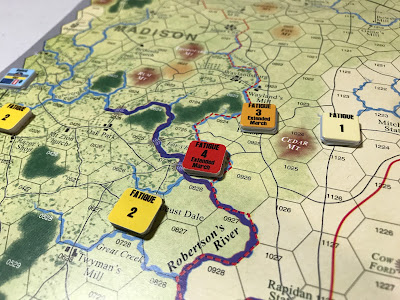
Next initiative phase sees the Confederacy win yet again. Jackson, after being refused the creek crossing last initiative go round, uses a leadership activation to tell Ewell and Winder to advance and beat back the Union from their positions before the majority of the Northern Army mobilizes.
To the left Ewell advances past the school house and attacks Union General Bank's fatigued and dogged division from the southwest. Under Nathaniel P. Banks command is Williams, the commanding officer that held the creek last turn.
As with many aspects of learning a system I am starting to see that you need a large ratio to really do some damage. Not rolling like ass is also a big contributor. Attacking across clear terrain against a defending unit with artillery is also not smart.
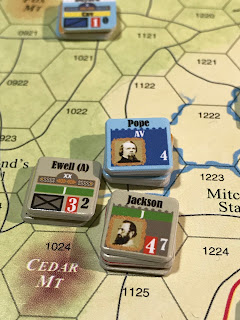
The -2 artillery modifier of the defenders negates my 3-1 ratio modifier and it comes down to a straight up roll once more. The Union forces roll a 4 and the Confederacy rolls a 3. Not good as the result is a -1. Ewell suffers a devastating setback and takes a loss of about 500 men as the dug in Union artillery eats him as he goes across clear terrain.

Williams is fatigued even more and though tired and low on supplies they hold ONCE AGAIN. The Confederate VP total is now -1, which cant happen, but its interesting to note how bad they are doing.
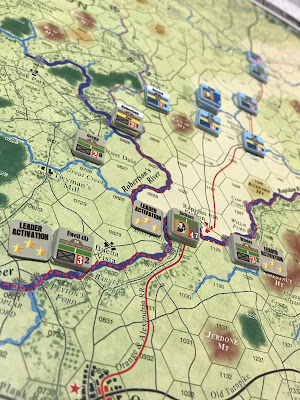
Now its up to Winder on the right of Jackson to give the South some good news. Winder takes his 4000 man division and prepares to attack the 1st Maine Cavalry Regiment. Like all Union cavalry before, in a sneaky delaying nighttime withdrawal, the 1st Maine retreats but is cut down as they try this now familiar tactic. Winder, low now on movement after planning a prepared attack, moves 1 mile up the road. With the loss of the 1st Maine the Confederacy gets a victory point back to move back to+1.

In his path now is Christopher C. Augur's 4000 man Union infantry division. The Confederate forces are about to be held in check and not able to advance much further.
Well seeing as how I have totally screwed up the Confederate advance learning the system, and I have indeed learned, I decide to wrap this one up and lick my wounds since there are forces heading down the road the South will not be in shape to contend with.
This scenario was however a great learning process in what I believe is an excellent Civil War battle system that really captures the ebb and flow of command, fatigue and the fog of battle. Most importantly it is a FANTASTIC solo game to attempt.
Next time Union...next time.
Next initiative phase sees the Confederacy win yet again. Jackson, after being refused the creek crossing last initiative go round, uses a leadership activation to tell Ewell and Winder to advance and beat back the Union from their positions before the majority of the Northern Army mobilizes.
To the left Ewell advances past the school house and attacks Union General Bank's fatigued and dogged division from the southwest. Under Nathaniel P. Banks command is Williams, the commanding officer that held the creek last turn.
As with many aspects of learning a system I am starting to see that you need a large ratio to really do some damage. Not rolling like ass is also a big contributor. Attacking across clear terrain against a defending unit with artillery is also not smart.
 |
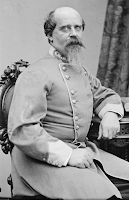
| Richard S. Ewell |

The -2 artillery modifier of the defenders negates my 3-1 ratio modifier and it comes down to a straight up roll once more. The Union forces roll a 4 and the Confederacy rolls a 3. Not good as the result is a -1. Ewell suffers a devastating setback and takes a loss of about 500 men as the dug in Union artillery eats him as he goes across clear terrain.

Williams is fatigued even more and though tired and low on supplies they hold ONCE AGAIN. The Confederate VP total is now -1, which cant happen, but its interesting to note how bad they are doing.
Now its up to Winder on the right of Jackson to give the South some good news. Winder takes his 4000 man division and prepares to attack the 1st Maine Cavalry Regiment. Like all Union cavalry before, in a sneaky delaying nighttime withdrawal, the 1st Maine retreats but is cut down as they try this now familiar tactic. Winder, low now on movement after planning a prepared attack, moves 1 mile up the road. With the loss of the 1st Maine the Confederacy gets a victory point back to move back to

In his path now is Christopher C. Augur's 4000 man Union infantry division. The Confederate forces are about to be held in check and not able to advance much further.
 |
| Christopher C. Augur |
This scenario was however a great learning process in what I believe is an excellent Civil War battle system that really captures the ebb and flow of command, fatigue and the fog of battle. Most importantly it is a FANTASTIC solo game to attempt.
Next time Union...next time.
Saturday, July 29, 2017
GCACW: August 9th A bloody day as Jackson shatters the 1st Rhode Island Regiment
August 9th has rolled around in my playthrough in the Cedar Mountain scenario of Stonewall Jackson's Way 2. On turn 2 all restrictions from turn 1 are lifted and forced marches are allowed.
There were no random events and no leader transfers so we go to the Action Phase. On the first action phase the Union army wins and Ricketts immediately moves his division of 9,000 men south through Culpeper to cut off Stonewall Jackson. The Confederacy wins the next initiative roll and use Gregg to march toward the school house across the Robertson River.
Gregg's infantry brigade attacks Bayards Cavalry at the school house forcing him to retreat far back. For some odd reason Gregg is not allowed to advance on the school house and he pulls his men up short (scenario rules dictate Gregg cannot enter that hex).

The Rebels win the next initiative roll and then use Stonewall Jackson to do a Leadership activation. They will now cross the Rapidan and drive on Culpeper!
Jackson's Confederate command pushes north. Ewell and Winder cross the Rapidan River.
 Stonewall Jackson drives A.P. Hill into the 1st Rhode Island Cavalry regiment and during the retreat of the Union cavalry they collapse and, demoralized from the attempt to withdraw, cease to exist as a unit giving the South a victory point.
Stonewall presses on and launches an attack across Cedar Run Creek against the under strength infantry division of Williams.


Williams is bolstered by Pope himself and told he must hold (picture above shows the stacks split apart so the chits can be viewed). Surprisingly he does. A.P Hill suffers horrible losses trying to cross the creek and loses about 500 men. The Union defenders are disorganized but they do not give any ground. Stonewall is forced to lick his wounds and regroup for the next assault across the creek. The action phase ends.


There were no random events and no leader transfers so we go to the Action Phase. On the first action phase the Union army wins and Ricketts immediately moves his division of 9,000 men south through Culpeper to cut off Stonewall Jackson. The Confederacy wins the next initiative roll and use Gregg to march toward the school house across the Robertson River.
Gregg's infantry brigade attacks Bayards Cavalry at the school house forcing him to retreat far back. For some odd reason Gregg is not allowed to advance on the school house and he pulls his men up short (scenario rules dictate Gregg cannot enter that hex).

The Rebels win the next initiative roll and then use Stonewall Jackson to do a Leadership activation. They will now cross the Rapidan and drive on Culpeper!
Jackson's Confederate command pushes north. Ewell and Winder cross the Rapidan River.

Stonewall presses on and launches an attack across Cedar Run Creek against the under strength infantry division of Williams.


Friday, July 28, 2017
Fire in the Lake might be next title
Still thinking it over. Fire in the Lake or learn Next War India Pakistan. I feel like Fire in the Lake has limited replayability. FiL has bot AI though. Tough call. I want a modern game after all this Civil War playtime. India Pakistan looks near impossible to learn but I am willing to give it a go...I did master GBOH after all.

Thursday, July 27, 2017
GCACW: August 8th ends with full Union mobilization
With the Confederate army worn down from marching during the first day's action the Union forces finally mobilized and moved south to block the forces of Stonewall Jackson
The Union Army swept the last few initiative rolls with the southern army having to pass the only roll they won. Using multiple leader activations the northern troops have begun to gather around Cedar Mountain to make a natural line of defense.
As the turn comes to a close and August 9th 1862 draws near Bayard's Cavalry and Robertson's Cavalry find themselves in an exhausted state.
Unknowingly I now see how the exhaustion and fatigue rules work. Disorganized units flip to exhausted and pretty much take an entire day to recover and be worth anything again. The initial probing attack across the Robertson river really put the two cavalry units (one from each side) out of comission for quite a bit. It is a clever system built into the game's mechanics that takes the tedious work out of the rules and lets you see what is going on at a glance on the battlefield.
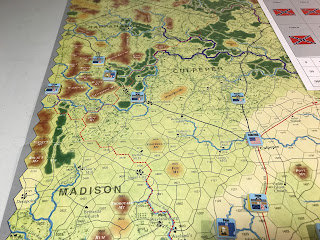
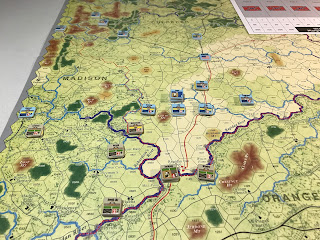
Below are pictures with the fatigue levels covered so that anyone can see how the field of battle is shaping up. In turn 2 (the 9th of August) all rules are open and Ricketts Union Division is released at 18 strength strong. It will be a furious two days coming up.

The Union Army swept the last few initiative rolls with the southern army having to pass the only roll they won. Using multiple leader activations the northern troops have begun to gather around Cedar Mountain to make a natural line of defense.
As the turn comes to a close and August 9th 1862 draws near Bayard's Cavalry and Robertson's Cavalry find themselves in an exhausted state.
Unknowingly I now see how the exhaustion and fatigue rules work. Disorganized units flip to exhausted and pretty much take an entire day to recover and be worth anything again. The initial probing attack across the Robertson river really put the two cavalry units (one from each side) out of comission for quite a bit. It is a clever system built into the game's mechanics that takes the tedious work out of the rules and lets you see what is going on at a glance on the battlefield.
Below are pictures with the fatigue levels covered so that anyone can see how the field of battle is shaping up. In turn 2 (the 9th of August) all rules are open and Ricketts Union Division is released at 18 strength strong. It will be a furious two days coming up.


Tuesday, July 25, 2017
GCACW: Robertson engages Bayards cavalry brigade
The Union finally won an initiative sequence in the video from last night, see the post before this one. As a result they were able to finally start to react to advance of Stonewall Jackson toward Culpeper. Sadly the Confederate forces won the next initiative roll and Robertson decided to force his hand across the Robertson River and assault George Dashiell Bayard's cavalry brigade.


The combat ratio was 3-1, with Confederate Beverly Robertson holding a sizable force. His tactical and artillery support were also superior but Bayard held the ford so had the defensive terrain. The rolls were made and came out rather close. This would mean that the differential would probably not be enough to damage either side but the men would be exhausted.

 The combat results caused a Dr and a Da which is disorganized for each side and a retreat for the Union forces and a advance for the Confederate forces. The rebels were FINALLY across the river but the fight sapped the strength of each side as they slogged it out to fatigue levels that would render them useless for the time being. Still a foothold had been gained in the risky charge and the Confederate Army now had a ford to get across some major terrain obstacles.


The combat ratio was 3-1, with Confederate Beverly Robertson holding a sizable force. His tactical and artillery support were also superior but Bayard held the ford so had the defensive terrain. The rolls were made and came out rather close. This would mean that the differential would probably not be enough to damage either side but the men would be exhausted.


GCACW: The Union finally mobilizes its forces and wins an initiative
Leading up to our first combat here is a video showing what happened to lead up to that moment and the fist initiative win by the Union forces in the Cedar Mountain playthrough. More to come after this post!
Tuesday, July 18, 2017
GCACW: The Union continues to delay, Confederacy marches on Rapidan: Cedar Mountain Part Three
The battle continues in my playthrough/learning session of Great Campaigns of the American Civil War: Stonewall Jackon's Way 2 Battle of Cedar Mountain.
The Union has lost 4 or 5 consecutive initiative rolls in the Action Phase and has yet to move a single unit. Their communication lines are drawn out and the leaders are slow to react to Stonewall Jackson's move on Culpeper across the Rapidan River. Below are the initiative rolls for the next 4 action phases...the Union losing each one.


Stonewall Jackson and Winder push to the edge of the Rapidan river but are not able to cross due to low movement rolls. On the left flank of the army (below) the South advances toward pinning down the Union Cavalry. No combat yet and only a minor meeting squabble earlier as the Union 1st Rhode Island Cav pulled out to avoid the advanced Southern units.
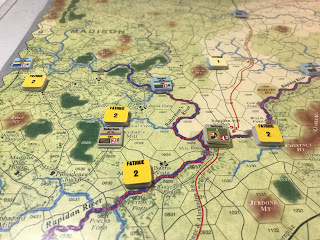
The Union has lost 4 or 5 consecutive initiative rolls in the Action Phase and has yet to move a single unit. Their communication lines are drawn out and the leaders are slow to react to Stonewall Jackson's move on Culpeper across the Rapidan River. Below are the initiative rolls for the next 4 action phases...the Union losing each one.


The South has been able to move its units to the brink of the Rapidan but poor movement rolls have really kept them from capitalizing on the wins of initiative. Still the Confederates advance but are now tired. Most units are at fatigue 2 and cannot force march or extended march due to the 1st turn rules. This allows the Union to at least sit back and now observe what the units of Stonewall Jackson are doing and react.

Stonewall Jackson and Winder push to the edge of the Rapidan river but are not able to cross due to low movement rolls. On the left flank of the army (below) the South advances toward pinning down the Union Cavalry. No combat yet and only a minor meeting squabble earlier as the Union 1st Rhode Island Cav pulled out to avoid the advanced Southern units.

Sunday, July 16, 2017
GCACW: Cedar Mountain Part Two
Continuing from the last post...we go on to the next action sequence and roll initiative.
You can catch up by checking the last post located here:
http://hudsonshideout.blogspot.com/2017/07/gcacw-cedar-mountain-part-one.html
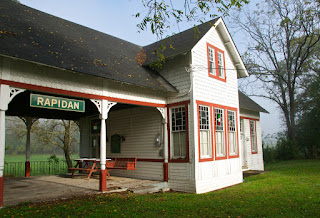
As we last saw Stonewall Jackson performed a leader activation and moved to threaten the Rapidan River crossing and the train station. The station is currently guarded by a 1 strength point Rhode Island Cavalry Regiment.

The dice are rolled and the Confederacy wins initiative again! This is perfect as they need to move fast to get up the roads and take Culpeper the major objective of the scenario. For the action sequence the Confederate player does another leader activation with Stonewall Jackson.

You can catch up by checking the last post located here:
http://hudsonshideout.blogspot.com/2017/07/gcacw-cedar-mountain-part-one.html
As we last saw Stonewall Jackson performed a leader activation and moved to threaten the Rapidan River crossing and the train station. The station is currently guarded by a 1 strength point Rhode Island Cavalry Regiment.

Jackson chooses two units to activate within his command range: Gregg's Brigade and AP Hills infantry division. The die roll now being made is for movement and it needs to be high so Jackson can maneuver and get his attack across the Rapidan in. The die is rolled and its a disastrous ONE. What happened? Some sort of communication error along the lines in getting the units moving? Were the orders received late? At any rate Jackson's units are bogged down and have only 3 MP's to use (+2 due to Confederate bonus). That may not be enough to move and attack since attacking takes MP points.
Jackson moves up the road with AP Hill and the cavalry of the 1st Rhode Island see the mass of grey heading towards them and mounts a cavalry retreat. They roll high and get a 6, +2 due to the terrain and this is 8. That's a total of 4 MP's subtracted from the Confederate movement. This empties Jackson's movement to 0 and he will not be able to continue the march or attack! He is stuck watching the 1st Rhode Island move 4 hexes back. They take a fatigue hit and become disorganized but it was worth it to get away.
On the left Gregg's Brigade moves up the road but loses a MP since he had to go through a crowded friendly hex.
All in all a poor turn for the Confederacy. Some poor courier is in big trouble after this snafu. We go onto the next initiative roll and the third action sequence in the next post.

GCACW: Cedar Mountain Part One
Im baccccck. And this time I am focusing on MMP's Great Campaigns of the American Civil War. Specifically Stonewall Jackson's Way 2.
I am setting up and prepping the first scenario in SWJ's 2 which is a small one called Cedar Mountain.
It only uses part of the map and a few units. I am still getting a grasp of the rules but so far I like it and the randomness of the die rolls for movement. Most euro gamers would hate a title like this since it involves dice and a luck factor but I love it. Besides there are ways built into the game to get better movement but you will push your men to higher fatigue levels.
This scenario takes from August the 8th to August the 10th 1862.
Here is the opening look at the board:

As you can see there is not much there but this makes it great for learning the rules.
The leader counters I love and they are remarkably close the original photos

Without further delay lets take a look at some sample action from the very start of the game. No random events are rolled in turns one or two so its close to possible that not much will happen in that aspect. This scenario is only 3 turns long.
The Confederates must attempt to take Culpeper. The Union must stop them. Pretty simple it seems so all roads lead up to that hex at 1418. In turn 1 neither army may make a extended march or a force march. Also no unit can do a corp assault move if its fatigue is 3 or 4. For the Union player Ricketts Division cannot do anything.
TURN ONE, ACTION SEQUENCE ONE
There are no random events so this is skipped. During leader transder the Union player declines and the Confederates have one leader and he is not needing to transfer (Jackson)
During the Action Cycle the dice are rolled and its a tie. That means the Confederate player wins since this is Stonewall Jackson's Way 2 and not the mini game All Green Alike included in the boxed game.
The Confederate player (me of course) activates Jackson using a Activate Leader action during the Confederate Initiative. Jackson gets a Leader Activated marker.
Jackson rolls a 3 for movement allowance, plus two as stated in the basic game rules. This gives him and the units he is activating 5 movement points to spend. A marker is placed on the movement track to show us what the MP value is for each unit we activate. The leader marker will not get moved and is there for reference.
Jackson immediately heads north toward Rapidan Station. The other units either follow him or split off left toward Great Creek. Each unit that moves is assigned on fatigue point and with that activation the first action sequence ends. Jackson must go fast and hard toward Culpeper to win this scenario. He needs to cross the major river at Rapidan station and drive off that Union Cavalry.


I am setting up and prepping the first scenario in SWJ's 2 which is a small one called Cedar Mountain.
It only uses part of the map and a few units. I am still getting a grasp of the rules but so far I like it and the randomness of the die rolls for movement. Most euro gamers would hate a title like this since it involves dice and a luck factor but I love it. Besides there are ways built into the game to get better movement but you will push your men to higher fatigue levels.
This scenario takes from August the 8th to August the 10th 1862.
Here is the opening look at the board:
(Heads up the image below is wrong I made two mistakes in setup)

The leader counters I love and they are remarkably close the original photos

Without further delay lets take a look at some sample action from the very start of the game. No random events are rolled in turns one or two so its close to possible that not much will happen in that aspect. This scenario is only 3 turns long.
The Confederates must attempt to take Culpeper. The Union must stop them. Pretty simple it seems so all roads lead up to that hex at 1418. In turn 1 neither army may make a extended march or a force march. Also no unit can do a corp assault move if its fatigue is 3 or 4. For the Union player Ricketts Division cannot do anything.
TURN ONE, ACTION SEQUENCE ONE
There are no random events so this is skipped. During leader transder the Union player declines and the Confederates have one leader and he is not needing to transfer (Jackson)
During the Action Cycle the dice are rolled and its a tie. That means the Confederate player wins since this is Stonewall Jackson's Way 2 and not the mini game All Green Alike included in the boxed game.
The Confederate player (me of course) activates Jackson using a Activate Leader action during the Confederate Initiative. Jackson gets a Leader Activated marker.
Jackson rolls a 3 for movement allowance, plus two as stated in the basic game rules. This gives him and the units he is activating 5 movement points to spend. A marker is placed on the movement track to show us what the MP value is for each unit we activate. The leader marker will not get moved and is there for reference.
Jackson immediately heads north toward Rapidan Station. The other units either follow him or split off left toward Great Creek. Each unit that moves is assigned on fatigue point and with that activation the first action sequence ends. Jackson must go fast and hard toward Culpeper to win this scenario. He needs to cross the major river at Rapidan station and drive off that Union Cavalry.


Subscribe to:
Posts (Atom)